Whether you’re riding for fun, or for fitness, knowing your heart rate will improve your riding. Keeping an eye on what your heart is doing will help you warm up more effectively, ride longer without burning out, maximize the benefit you get from each ride, and see more long-term benefit overall. Sounds pretty good, right? This article outlines the basics of reading your heart rate, using that information to chart progress, and putting it to work with some basic training routines. We will cover the items you need to get these benefits at a range of prices, and show you how to get the maximum benefit out of each of them. Spoiler alert: All you need is a HRM and your smartphone to get started.
What is Heart Rate:
 Your heart rate is the number of times your heart beats per minute as it pumps blood through your system. You can measure it by taking your pulse, or by wearing a heart rate monitor (usually a band around your chest) which communicates your heart rate in real time to your phone or bike computer.
Your heart rate tells you your exertion level, in easily measurable terms. As you do more work, your heart rate rises, and it drops as you exert yourself less. Heart rate is a more accurate appraisal of how much work you should be doing at any given time, compared to just ranking how you feel about the effort you’re putting out. Have you ever gone out for a ride and just felt exhausted halfway through? You were likely pushing yourself too hard out of the gate. Monitoring heart rate zones will allow you to ride farther and more effectively, regardless of how you’re feeling/how well you ate/what the conditions are like.
What Knowing HR Will Do For You
- Once you know your resting and max heart rate (see below on how to find these), you can use those numbers to plan your workouts. Whether you’re in great physical shape or not, you can tailor each workout so that you’re getting the most out of it with a lower risk of injury.
- By using a percentage of your maximum heart rate, you can plan out training zones, and by operating within these zones you can tailor each ride to give you the maximum health benefit.
- If you’re just riding for fun or distance/speed goals, knowing your heart rate (and what heart rate zone you’re in) will help you make the most of the ride, by ensuring that you still have some energy left later on.
Find Your Resting Heart Rate and Max Heart Rate
- Measure your heart rate in the morning while resting, 5 days in a row. Take the average and use that as your resting HR. Use your resting heart rate to gauge the efficacy of your workouts- you should see it drop as your fitness increases.
- For max heart rate (at home) you should make sure you have a base level of fitness. (Don’t try to get on the bike for the first time in months and figure this out on day one.) After a 15 minute warm-up, find a long hill (or crank up the resistance on your trainer) until you’re operating at about 70% exertion (fast, but not painful), seated. Increase that incrementally over five minutes until you can’t put out any more power in the saddle, then get up and sprint at maximum exertion for 15 seconds. As quickly as you can, read your peak heart rate, and use that number as your HR max. (For reference, it should be in the ballpark of 220 minus your age).
Understanding Heart Rate Zones:
You’ll see most training programs (simple or complex) refer to ‘training zones’. These zones are based on a percentage of your maximum heart rate (MHR). Your body reacts differently to the stress of each heart rate zone, and so tailoring workouts around these zones can help maximize the benefits you see.

Zone 1. Warmup/recovery. 50-65% of MHR. Use this zone for recovery workouts (where the entire workout is kept within this zone to aid in muscle recovery) as your body will flush lactic acid most effectively here. Use this zone to warm your muscles up before a workout to lower the chance of injury.

Zone 2. The Tone Zone. 65-75% of MHR. Consider this your home base. This is where you burn the most fat, and this zone should make up the bulk of your workouts. This zone should be one you can comfortably stay in for half an hour plus, and you should be able to carry on a conversation at this pace.

Zone 3. Aerobic Capacity. 70-80% of MHR. You know you’re working out, but you can feel like you have more in the tank. This will help improve fitness, power, strength, and bloodflow.

Zone 4. The Pain Cave. 80-90% of MHR. Your Anaerobic threshold (the point at which lactic acid starts to accumulate in your muscles, and anaerobic processes become more dominant.) Everything sucks when you’re in this zone, but training here will improve your lung capacity, endurance, and maximum power. Expect to spend less than 10 minutes at a time in this zone.

Zone 5. Redlined. 90% plus of MHR. Training here helps improve your blood circulation under stress, making you more efficient at higher power outputs. You’ve been here before. This is where you go when you’re tearing the legs off your friends in a sprint, when that e-bike rider ahead of you is about to rue the day they were born, or when Tim Hortons is about to switch to the lunch menu and you’re still six blocks away.
How to Use HR Every Day:
If you’re already commuting to work, or riding regularly, keeping an eye on your heart rate can allow you to capitalize on that effort.
Commuting: Without a doubt, just being out on the bike is an awesome and worthwhile venture, and adding numbers to that isn’t necessarily going to make a ride in traffic any more fun. That said, knowing that you are going to experience concrete results is a great motivation on those rainy days where the car seems so much more appealing. By staying within certain heart rate zones while commuting, you can ensure that every kilometer you pedal is doing the maximum amount of good for your health, while limiting the chances of you hurting yourself or wearing yourself out.
Recreational riding: For the recreational rider, the rides that you’re already doing can be making you stronger, more efficiently, if you keep an eye on the zones you’re riding in. We all know how easy it is to plan a fun, easy, relaxed afternoon spin, and end up way out in the middle of nowhere with no energy left because you’ve gone out too hard. Strap on a heart rate monitor and you can ensure you have an enjoyable time the whole ride through, and see additional training benefit as well!
Training With a HRM:
Training using an HR monitor … will make you an infinitely better all-round cyclist. If you’re training for specific events … you can tailor your training to suit. If you just want to lose weight, cycling in the correct zones will burn fat and you’ll shed excess pounds in no time.
-Harry Blackwood, bikeradar.com
There are a HUGE number of pre-made workouts online. Hitting up sites like wahoofitness and kurtkinetic will definitely pay off with free workout programs to keep you motivated as you improve your fitness. If you don’t mind watching ads before every workout, YouTube has classes you can watch as you spin.
Here’s a quick 30 minute spin to get you started, from wahoofitness.com
 5:00 min of warmup. Spinning without exceeding 60% MHR
5:00 min of quicker spinning, up to 65% MHR, then spin down to 60% MHR
10:00 min of spinning at 70% MHR and cooldown to 60% MHR
5:00 min at 75% MHR then drop to 65% MHR
5:00 min of cool-down spinning to reduce HR to less than 50%
Total time: 30 mins
What You NEED to Get Started. In an effort to keep this adventure wallet-friendly, here are the basics.
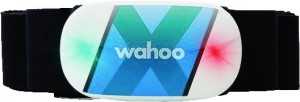
- A Heart Rate Monitor: You’re not going to take your hands off the bars every 2 minutes to take your pulse. You need a heart rate monitor. Wahoo fitness makes a great one that you can get through your LTP Sports dealer. They’re inexpensive, and they will make a positive difference.
- Your smartphone. If you can pick up Bluetooth, you can pair your HRM to your phone, and track it using one of a TON of free apps. We recommend Wahoo Fitness or Kinetic apps, as they’re really easy to set up and start using within about 5 minutes.
- A good attitude. Commit to using your heart rate monitor. The more data you collect, the more useful it is.
What You WANT to Get Started. Ways to spend your money (preferably from a LTP Sports dealer)
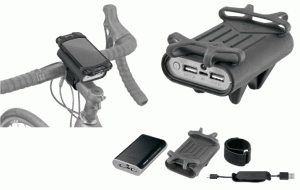
- A phone case. For a lot of these workouts (especially when you’re spinning) you need to keep an eye on your heart rate. You can’t pull your phone out of your pocket every 30 seconds, and balancing it on the bar while you sweat all over it isn’t gonna work either. Check out these cases from Topeak.
- A cycling computer, so you don’t have to use your smartphone. While it’s most economical to use the equipment that you already have, a computer like Wahoo’s Elemnt or Reflekt are just plain better than using your phone; Easier to use, easier to read, and more accurate.
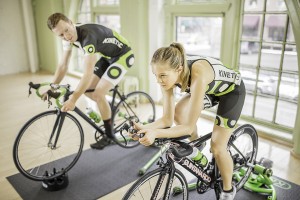
- An indoor cycling trainer. If you want to get faster, stronger and healthier, you need to work out often. Busy lives being what they are, efficiency is key. A trainer allows you to get a workout in, any time of day, regardless of weather conditions. We already gave you a bunch of good reasons to get one here.
Investing in your health:

Wahoo Tickr HRM
Wahoo Tickr HRM
Costs less than a tank of gas
LTP part number: 183528-01

Topeak Smartphone holder and powerpack
Topeak Smartphone holder and Powerpack
Costs less than a month’s car insurance
LTP part number: 406110-01

Wahoo’s immensely popular Kickr Smart Trainer
Wahoo Kickr Trainer
Costs less than a year with a personal trainer.
LTP part number: 183525-01
We hope you found this guide useful, and see the value in monitoring your heart rate when you ride. We suggest visiting the following sites for further reading!


